
Using Crossovers in the Real WorldWith advanced and truly flexible digital crossovers/processors you virtually have enough rope to hang yourself. It is not a trivial matter to set up one of these types of processors to get the best performance possible out of the loudspeakers you have. However, with the right tools and a little bit of work it can become a painless and rewarding process. But where do you start? At what frequency do you crossover from the low frequency driver to the high frequency driver? What slope should the crossover filters be? What alignment? Should the filters have the same electrical crossover frequency or should they be underlapped or overlapped? The answers to these questions will depend on the components being used in the loudspeaker as well as it's intended application. To be able to begin answering these questions it is essential to have the right analysis tools at your disposal. You wouldn't attempt to mic a guitar rig with a lavaliere mic would you? For our discussion the right analysis tools consist of a time discriminate spectrum analyzer. A TEF, SIM, Smaart, or any other TDS based or FFT based measurement device that is capable of sampling a signal for a discrete period of time will work. A good old RTA will not do the job in this application. This time discrimination capability is necessary in order to remove the effects of the room from our analysis so that you see only what the loudspeaker is doing. In addition to the analyzer you chose, a reasonably high quality measurement microphone with good amplitude and phase response characteristics and a good quality, low noise microphone preamp will be required. Remember that the measurements you make, regardless of what type of measurement system you chose, are only as accurate as the signal from the measurement microphone (garbage in = garbage out). Once you have the proper gear you can begin to analyze the loudspeaker in question to see how to get the most out of it. As an example, lets investigate a 2-way system with a 15 inch woofer and a 2 inch exit compression driver on a horn. The first order of business is to temporally align the two devices so that their signals arrive at the measurement mic at the same time. The measurement mic should be located on-axis for the system. Typically this should be somewhere between the horn and the woofer at some distance away from the loudspeaker. For our example the on-axis position will be 4" below the center of the horn & 8" above the center of the woofer. This is the small area on the baffle in between the two. Measure the arrival time of the signal from each component individually and note the difference. Then delay the signal to the component with the earliest arrival time by that difference. Measure each component again with the signal delay in place to check yourself. The two arrivals should now coincide with each other. At this point some people would tell you to just put a 4th order Linkwitz-Riley filter on it at 1,200 Hz and be done with it. However, this is not always the best option. While a 4th order Linkwitz-Riley summation does yield good on-axis and off-axis response under textbook conditions, you must also take into account what the loudspeaker components themselves are doing; namely the amplitude roll-off and it's accompanying phase shift. Figure 1 shows what perfect 4th order Linkwitz-Riley summation is in the vertical plane with ideal components (perfectly flat & phaseless from DC to light) crossed over at 1,200 Hz. If you ever run across any of these type of components please let me know. They are extremely rare as they must be manufactured with Unobtainium. 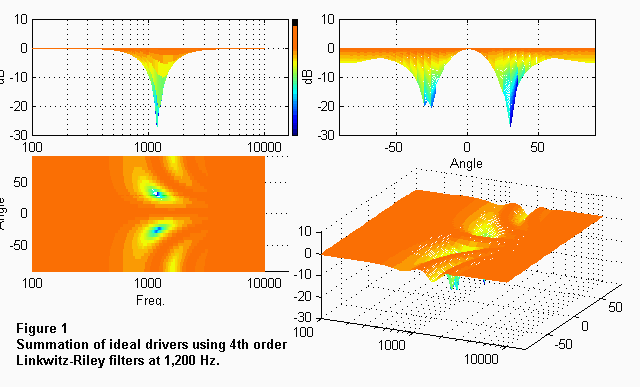 As you can see at approximately 0 degrees (on-axis) there is good (flat) summing of the woofer and the horn. Note, however, that as you move off-axis vertically (either up or down) you encounter a dip, or cancellation, in the combined response of the woofer and horn. This is due to the difference in distance that the sound must travel from the two components to reach the listener at these off-axis positions. It is unavoidable and it can not be equalized. Figure 2 shows what happens when real world components are used with the same filter settings of Figure 1. The amplitude roll-off and accompanying phase shift of the components are taken into account in this summation. Note how the response cancellations have changed shape and now occur at different vertical angles. Having a response dip of this magnitude within +/-20 degrees of on-axis is unacceptable. It is relatively easy to get a flat response on-axis. The trick, however, is to get descent amplitude response throughout the desired coverage angle of the system. This means doing lots of measurements at lots of different angles until you are satisfied with the results or until you choose another line of work.  By changing the crossover filters to a 2nd order Butterworth lowpass at 900 Hz for the woofer and a 3rd order Bessel highpass at 1,300 Hz for the horn, the combined response is decisively better. As you can see in Figure 3 this system summation is almost ideal 4th order Linkwitz-Riley response. This response is just about as good as it is going to get for drivers that are seperated by the distances used for this model. This illustrates why the response of the individual drivers is so important in selecting the proper crossover filter settings. 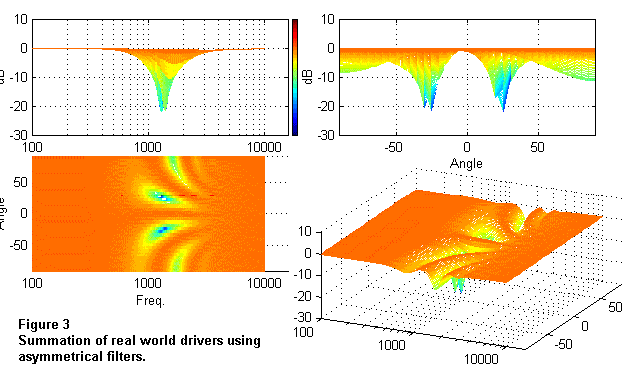 The second step to achieving this type of optimized performance should be to analyze the amplitude and phase response of the drivers in your system. By doing this you can see over which range of frequencies the drivers may be used. This should give you an idea of the general area of where the acoustical crossover frequency should occur. I say acoustical crossover, as opposed to electrical crossover, because this is the point at which the output of the two drivers will actually cross. You will also be able to see areas in the response of each driver near the intended crossover point that may benefit from individual driver equalization prior to implementation of the crossover filters. This will allow you to flatten them out and have them roll-off more smoothly. This in turn should lead to better summing on and off axis. Constant directivity horn equalization can also be applied at this point to flatten out the high frequency region of the compression driver / CD horn. You are now ready to start applying the crossover filters to the drivers. Unfortunately, there are no rules here. You just have to jump in and work with it until you are satisfied with the system performance. When you have a good on-axis response either rotate the speaker system or move the measurement mic to several other positions and take some more measurements. Typically these should be in the vertical plane, up and down relative to the speaker. Most loudspeakers are arranged with the drivers that cover different frequency regions stacked on top of each other. As such, they are symmetrical in the horizontal plane and shouldn't present too much of a problem (a floor monitor is an obvious exception). The vertical plane, as can be seen in the graphs, is where the off-axis summation problems are most likely to occur. Look at the response at these positions to see how well the drivers are summing off-axis. If the summation at different angles is not satisfactory you will need to make adjustments. Some things to try to get good summation on and off axis are:
After you have repeatedly measured on and off axis you will begin to see what filter alignments and slopes will work best for that particular combination of drivers. Don't get discouraged if you can't get the system perfectly flat. Get uniform response on and off axis. After you accomplish that you can equalize the system for whatever overall response curve is desired. If you want it flat or "smiley faced" or bumped in the midrange you can have it and you will have it across the entire coverage pattern of the loudspeaker. Remember, you can fix a hole in the amplitude response with EQ. You can't fix a hole in the directivity response. What all of this means is that just because your crossover/processor unit says Linkwitz-Riley doesn't mean that your system is performing as Linkwitz-Riley theory dictates. The entire system has to be viewed as a system and all aspects of all of its parts taken into account to obtain the desired performance. How to Read the GraphsThe graphs that accompany this article are the system amplitude (frequency) responses (from several different perspectives) for the simulations of the example 15 inch woofer and 2 inch exit compression driver/horn loudspeaker system. The response graphs are 3 dimensional. They contain information about frequency (Hz), energy (dB) and vertical coverage angle (degrees). The lower right graph in each figure is an oblique view of all three dimensions. The upper left graph is a view of just energy and frequency. From this view you can see the total amplitude response deviations versus frequency. The upper right graph is a view of just energy and vertical angle. From this view you can see which angles have energy dips or peaks. The lower left graph is a view of just vertical angle and frequency (a top view the 3D). From this view you can see at what frequency and angle the dips and peaks occur. The color of the graph changes with the amount of energy (dB) at that particular frequency and angle. Please note that these simulations are for the vertical plane. They cover from 90 degrees above (straight up) to 90 degrees below (straight down) the axis of the loudspeaker. The center of the horn is located 4 inches above this axis while the woofer is located 8 inches below this axis. At this point I should mention that for the simulations used to generate these graphs the directivity response of the woofer is properly modeled, however, the horn is not. When viewing these graphs please keep in mind that as the horn begins to gain directivity control (in the high frequency region) the graphs should actually show an energy loss (roll-off) as the vertical angle is moved farther away from 0 degrees (on-axis) in either direction, up or down. With this in mind the astute reader can see how to actually take advantage of the off-axis cancellations that occur to achieve better system directivity control to a lower frequency than is possible with just the horn itself. |
|
|
| Excelsior Audio Labs |